Showing posts with label crochet. Show all posts

Wednesday, January 21, 2015

Yarn Doodles: Tawashi flowers

Tawashi Flowers


Oh, my goodness! Time flies! We've had a busy time here, a new grandbaby, trips away, Christmas company and a major house painting project...

Yesterday, was the first day in ages that I seemed to find time to sit down, relax and do a little yarn doodling!

After completing two Christmas stocking projects for our 2014 grandbabies, I could not face anything wooly until now. Honestly, one of the stockings was being completed as Santa packed his sleigh – it was a real race.

Anyway, these little bitties are Tawashis – a free pattern from Ssh, I'm Counting. I've made them from little scraps of cotton yarn, using a 4.5 hook. Not only am I using up little bits and pieces, I'm getting into the swing again for a larger project – limbering up, so to speak. They're meant for washing your face...use once then throw in the washer when you do your towels. We'll see how they work!

Try some yourself. It's an easy pattern, great for when you're watching a movie.


Friday, September 12, 2014

Learning to Knit? Three Easy Fingerless Glove Patterns!

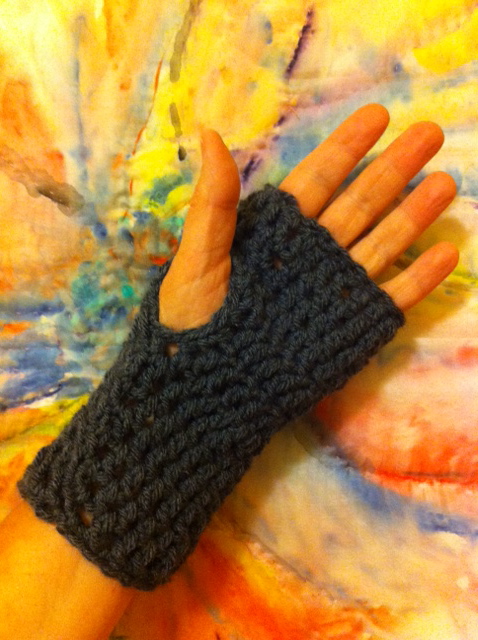
Maggie's Crocheted
Fingerless Gloves


Well, Mother Nature made her point very clear this week in southern Alberta. 


Yes, she's in charge. 


Snow, sleet and a nasty temperature dip after a lovely late summer weekend.  : (


Maggie's Knit
Fingerless Gloves


My tomatoes are grumpy over my insistence that they wear sheets at night...

...and I'm grumpy about needing to wear a jacket and fingerless gloves! 

I still have (and wear) the two pairs of fingerless gloves I crocheted and knit in the fall of 2012. I love them because they're tiny enough to tuck into my jacket pockets and always have on hand (pun intended).

Link to crocheted gloves here.

Link to knit gloves here.


Looking for my gloves, however, reminded me that I forgot to tell you about a great little pattern I found this summer.  Even better, this pattern comes with a great little video from one of my favourite knitting websites, Very Pink.  Quick to complete, they were a perfect birthday treat for my sister.  If you want to learn to knit, you really need to check out this website and the mitts would make a wonderful first project. 

A great "free" pattern from
Very Pink


For wool I used Malabrigo Rios Yarn (871 Playa). I mention that because it's a wonderful pure marino superwash wool made in Peru.

Rio means 'river' in Spanish. Malabrigo Rios is named after the four major rivers in Uruguay: Rio Cuareim, Rio Uruguay, Rio de la Plata, and Rio Negro. Each river is represented by one ply. These plies twist together like winding rivers. Rios also signifies the yarn's washability; for millennia, rivers have provided water for washing garments.”

Makes you look at a ball of wool in a new light, doesn't it? If you're looking for wool to go with demin, this is it!

Side note....


My original plan was a little hoodie for my grandson. However, by the time I got through the back, I realized I did not have nearly enough wool. Too late to buy more (and it would have cost a fortune to buy enough). Oh, well. I learned a lesson about yards vs grams and substituting yarns!

Thursday, July 10, 2014

"How to" Crochet: Maggie's Sunflowers and Daisies


It's a welcome break from my other knitting and needlework projects when I pull out my bowl of Little Bonbons cotton yarn.

For a number of months, I've been experimenting with little flowers I've discovered on other blogs. They're sweet when turned into baby barrettes and a nice little touch when making a card or decorating a gift. I even used a few to upcycle a school frame.

My latest little experiment? My own little version of sunflowers and daisies!

Here's my “how-to” for making a sunflower.

Yarn: You can use any weight yarn and the appropriate sized hook. I used Little Bonbons cotton yarn and a very fine hook. Terms used are American: single crochet (sc), half double crochet (hdc), double crochet (dc). If you're not sure, google the terms. There are multiple sites and youtube videos that explain them well.

To begin: With brown yarn, chain 4 and slip stitch together to form a ring.

Round 1:
Work around the ring... 10 sc stitches. Finish by slip stitching into your first sc. Cut the yarn and darn in loose ends.

Round 2:
Switch to yellow yarn. You'll make one petal in each of your 10 brown, single crochet stitches from round 1.

Crochet 1 sc to attach the yellow yarn. Chain 6.

Crochet back down the chain you just made: 1sc, 1hdc, 2 dc, 1hdc. Finish petal with a slip stitch into the same brown single crochet stitch you started from. First petal finished!

Make nine more petals: Single crochet into next (brown) stitch. Chain 6. 
Crochet back down the chain: 1sc, 1hdc, 2dc, 1hdc. Finish with a slip stitch. Repeat, repeat, repeat... : )


My little daisy follows the same pattern.

When finished, I pin my little flowers upside down to my ironing board. I then hover my iron over each one and give it a shot or two of steam. Be careful not to touch the yarn. Leave for five minutes or so before unpinning.

That's it! Enjoy!
Maggie


Tuesday, May 27, 2014

"How To" Crochet: Maggie's Little Chrysanthemum


A simple little flower, but I designed it myself and I'm tickled 
with how it turned out!

Maggie's Little Chrysanthemum


Here's my “how-to”...

Yarn: You can use any weight yarn and the appropriate sized hook. I used Little Bonbons cotton yarn and a very fine hook.

To begin: With yellow yarn, chain 5 and slip stitch together to form a ring.

Round 1: Work around the ring... 10 single crochet stitches. Finish by slip stitching into your first single crochet.


Round 2: Look at those single crochet stitches. Each one has a front and a rear bar. Continue with your yellow yarn. Chain 10, then slip stitch into the front bar of the first stitch from round 1. Chain 10, then slip stitch into the front bar of the next stitch. Continue around the circle until you have ten yellow loops.


Round 3: Take your orange yarn, chain 12 and slip stitch into the back bar of the round 1 stitches. Continue around the circle (chain 12, slip stitch into the back bar) until you have ten orange loops. Finish off by stitching in all loose ends and adding a button.


Please ask if you have any questions!

Happy crocheting!
Maggie

PS The patterns for the little pink flower and leaves and the red May Rose can be found at Attic 24.


Thursday, May 22, 2014

Little Bonbons: Mandala Project Idea


I've really enjoyed making little mandalas this past month. Lucy at Attic24 got me started and, since then, I've experimented with different yarns and patterns, sizes and colours. They're a happy little project to work on between baby sweaters and flowers.


But, what DO you do with them? Yes, they make pretty little summer coasters and a slightly larger one looks lovely under a glass jar of tulips. Lucy has a little cluster of them grouped on a wall.

But....here's another idea!

I use a recycled Mason jar for buttons...a little mandala “shower cap” was the pretty touch it needed!


This mandala was made from Little Bonbons cotton yarn. I've made a number of them (and some are saved for another project idea).


Check for size first, then on the wrong side string some elastic cord. I used Bead Landing 0.5 elastic...found it in the bead section of Michael's. Use a generous amount and thread three strands, checking to make sure it's not visible on the front.

Maggie's Button Jar

Inside out, secure your mandala to a recycled jar with an elastic band. Tighten and knot your elastic threads. That's it!


Thursday, May 8, 2014

Mandala Magic!

I've been trying my hand at crocheting a Mandala. Have you ever tried one? They are such pretty little bits of colour! 

Along the way, I've learned some new stitches and stretched a little by playing around with a beautiful design created by Barbara Smith at MADE IN K-TOWN.


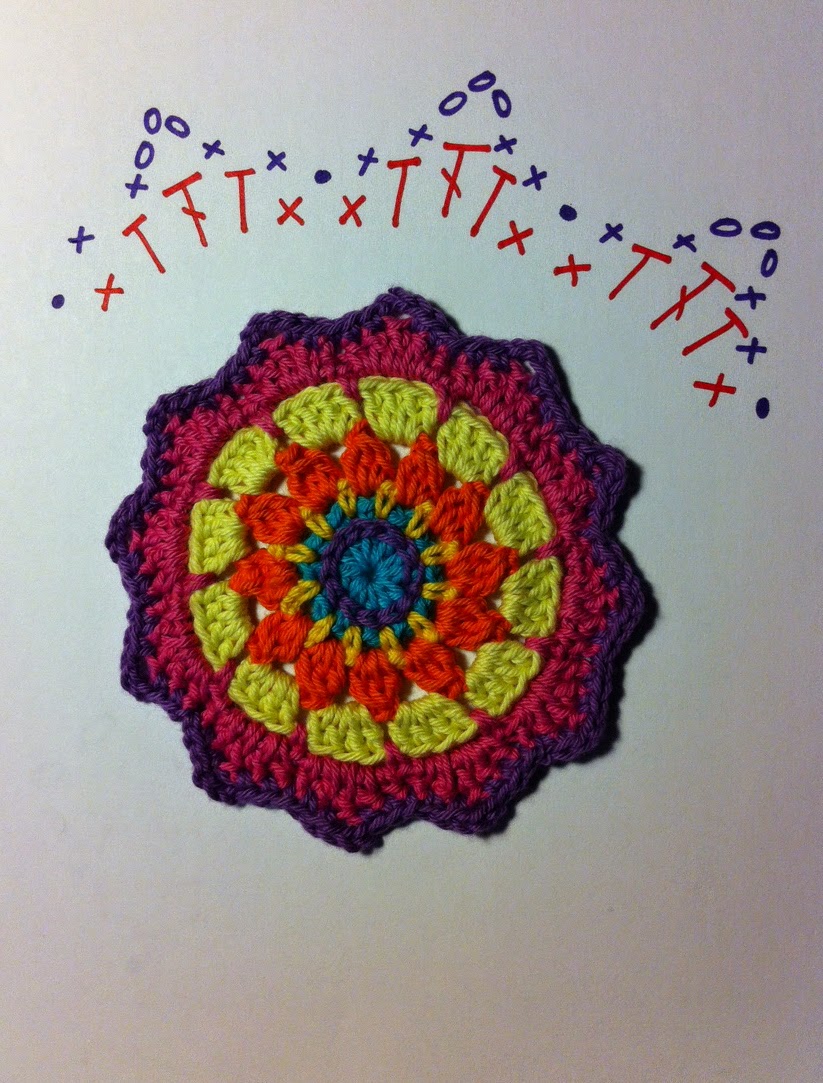
I'm also trying to read and write patterns using symbols. Oh, my! That part is hard!  

I used my teeny tiny crochet hook and Lion Brand Yarns "Little Bonbons", however, you could use whatever yarn you have around.  Only very small amounts are needed.


Little Spring Mandala
designed by Barbara Smith (Made In K-Town)


The first mandala I tried, Little Spring Mandala, was designed by Barbara Smith at Made In K-Town. Simply beautiful!

The third round (pink) is “dc3tog”... double crochet three together... a new stitch for me, but Barbara explained it well.

The orange “overlay” stitch was also new. Google “overlay mandala” images to see what you can do when you layer colours over colours!

Maggie's Second Little Mandala
(based on Little Spring Mandala)

The second little Mandala follows the same directions for Rounds 1 – 4. I added an overlay stitch on Round 1 instead of Round 4.

As I wanted this one to be smaller, I skipped Rounds 6a, 6b and 7.

Instead, I did Rounds 8 and 9.

To help this little mandala tie in to the first one, I finished with the purple round. I like the little points! Can you figure out what I did by looking at the symbols? There's an excellent PDF Crochet Symbol Chart at Craft Yarn Council you can print for reference.

Maggie's Third Little Mandala
(based on Little Spring Mandala)
Here's my third experiment! I followed the Little Spring Mandala directions for Rounds 1 – 7 and then finished with a scalloped edge:

sl, sc, hdc, sc, sl

As I said, drawing the symbols is harder than you'd think! Clear as mud? Hope so!

Cheers,
Maggie

Thursday, April 17, 2014

Another Little Bonbons Project...Bunnies and Owls

Two of my little grandbabies are having birthdays soon. It's ever so much fun shopping for little people!

I decided to make my own cards and found some sweet (and free!) patterns for a little bunny and an owl at Love the Bluebird. Scroll down the page to find the picture links for the patterns on the right side of the page. There's also a pumpkin.

Made with my teeny tiny crochet hook and Little Bonbons cotton yarn, they are about 2 1/4 inches long, quick to make and perfect for a scrapbooking or card project. Note, I changed the bunny's tail so it would be flat: Make a magic ring and then 10 single crochet stitches (almost the same as the owl's eye).


Thursday, March 13, 2014

Experimenting! Lion Brand Bonbons, little shamrocks and roses!


Some more experimenting!


I couldn't resist these little balls of yarn, Lion Brand Bonbons (eight per package).


Fortunately, I had the tiniest hook imaginable that I'd inherited from my mother: a Morrall's Aero. On the back it says “1 Made in England 14”. I've looked up some charts, but can't really figure out what that means.


First, I tried some of the little flowers I'd tried before. Quite a difference in size!


And, since it's March, I tried some little shamrocks – the easiest pattern ever and each one took only seven minutes.


Saturday, March 8, 2014

Yarn Doodles! Tiny flowers and leaves to crochet

Maggie's Yarn Doodles: Tiny Flowers and Leaves


I call these yarn doodles!

My knitting basket currently has two projects – a sweet little, “top down”, no seam baby sweater and a small blanket to tuck in around a little one in an infant car seat. Both projects are at the stage where there are no complicated bits, so they come out when the TV is on.

Wanting a little challenge, I'm also trying little sample bits of interesting patterns I'm finding on the Internet and this past week's theme was spring flowers. Not sure how I'll use these little bits of pretty, but I'm thinking baby hats and hairbands.

You can play around with hook size and wools when making these flowers. I used a 3.50 mm hook and Lion Brand (Vanna's Choice) medium weight (4) acrylic yarn: white, dusty purple, aqua, antique rose and Loops and Threads (Impeccable) fern.

The purple and blue flowers (2.5 inches diameter), plus some tiny leaves (1.5 inches) are courtesy of Tara at Mamachee.

The little white flowers (1.5 inches) are from Jo at About Mo and Me.

Lucy at Attic24 designed the pink May rose (2 inches diameter) and the larger leaf (2.3 inches).

All three ladies have multiple free patterns on their blogs. Be sure to explore!

Have a great day!
Maggie

Monday, March 3, 2014

A little crocheting...polka dots!!


Good morning!

It is so cold here! I'm tucked up inside, watching TV and playing with the yarn left over from my Maybelle afghan project.

First, let me just say that if you have Netflix, check out Endeavour, a PBS Masterpiece Mystery. It's a prequel, featuring a young Inspector Morse. I was so disappointed when I realized it was just a Mystery movie instead of a series.

For something a little scarier, watch another British mystery show, The Bletchley Circle. There are 7 shows in all (45 minutes each). Four women who worked as decoders during WWII regroup in 1952 to solve some murder mysteries! Good stuff!

Anyway, back to my yarn basket! After making some little hearts to hang on a branch – a little bit of Valentine prettiness – I thought I'd replace the hearts with some polka dots. These little circles took only a few minutes each to crochet.

Here's how...

You need:
3.50 mm hook (US size E/4; UK/Canadian 9)

Variety of Medium (4) yarn...I used Vanna's Choice by Lion Brand (aqua, magenta, cranberry, kelly green, antique pink, dusty purple, beige, colonial blue) and Impeccable by Loops & Threads (fern)

Directions:
Using first colour, chain 3, then sl into first chain.
Chain 1.
Maggie's Polka Dots
* sc, ch 1 * seven times
* sc in next 2, ch 1 * until circle is two inches in diameter.
Finish by darning in tails.

Using second colour, sc around outer edge of circle. Tie yarn loosely in a knot, leaving 4-inch tails.

Note: As you single crochet, hook yarn through back side of stitch. This will create a spiral pattern.

I'm not experienced at writing directions. I hope you can understand my notes!!

Cheers,
Maggie


Saturday, February 8, 2014

Crochet...Valentine Hearts


Feeling a little under the weather, so I'm snuggled under a quilt, watching a movie on Netflix and sipping some peppermint tea. 

Since Valentine's Day is just around the corner, I thought I'd crochet up some little hearts.  I've attached loops with the intention of hanging them from a branch cut from the garden.  After the 14th, I'll tuck them away with my Christmas decorations.

I tried a number of free online patterns and this one from PlanetJune is my favourite.  You can make the hearts in three sizes.  The largest is about three inches across and takes under 15 minutes to complete.

Friday, November 15, 2013

Little Christmas Ornaments to Knit and Crochet

Jingle Bells


My little stack of bells is growing!  

I love little projects!  Easy to carry around, simple enough to do while watching a movie, quick to finish... : )

Last year, I knit little toques and stockings to give away.  I also tried a few bells - here are the directions.  


This year, I've also been crocheting little stars.  Lucy from Attic24 has a free pattern you can try. 

A Tiny Star - from Attic24


My first little stars were made with the same wool I used for the bells and toques -

Vanna's Choice by Lions Brand.  I then experimented with some finer, gold yarn (3.5 hook) and then the Winter Red Lustre-Sheen by Red Heart.  


I'm pleased with how these little ornaments are turning out!  

Maggie

Friday, August 9, 2013

DIY Crochet Project: Flower Power!


Flowers are blooming!  Well, maybe not in my garden - but they're definitely popping out of my yarn basket.  

I found a great little (free!) pattern, Maybelle Crochet Flower, that's available as a PDF in either UK or USA terms.  You might like it, too.  If you are a visual person, check out the photo tutorial My Rose Valley created.

This pattern is easy to follow and quick to memorize, so it's just right for when I'm watching TV or chatting.  And the flowers are small enough to take along when I go out.  

Maybelle Flowers


Wouldn't this flower pattern make a beautiful baby blanket for a little girl?  Rose flowers, or maybe a variety of pastel shades, with a cream border would be very pretty.  
Crochet hook: 4.50 mm

Wool: Vanna's Choice (Lion Brand) and Impeccable (Loops & Threads)

"The Plan": These little flowers will be bordered in green and turned into 7-inch squares for an afghan. I've simplified the square pattern My Rose Valley posted and now I'm thinking about how I'll join the squares and create a border.

It's enjoyable having another project on the go!