Tuesday, May 27, 2014

"How To" Crochet: Maggie's Little Chrysanthemum


A 
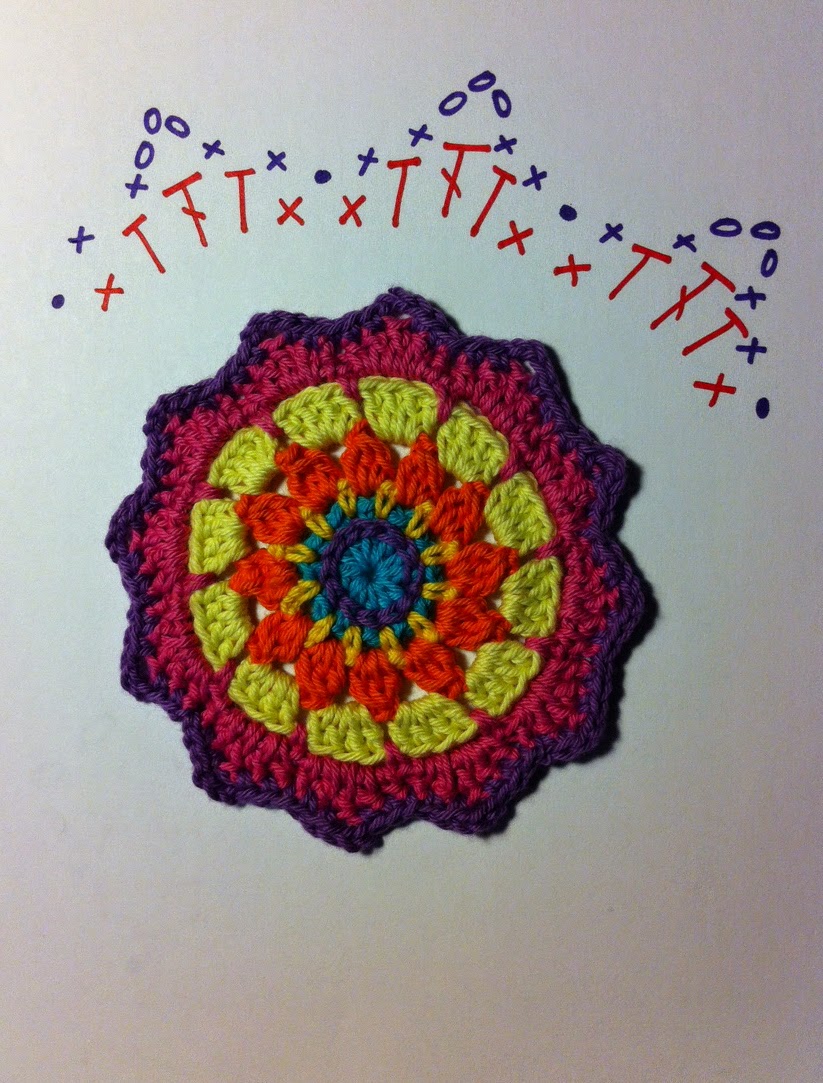
simple little flower, but I designed it myself and I'm tickled 
with how it turned out!

Maggie's Little Chrysanthemum


Here's my “how-to”...

Yarn: You can use any weight yarn and the appropriate sized hook. I used Little Bonbons cotton yarn and a very fine hook.

To begin: With yellow yarn, chain 5 and slip stitch together to form a ring.

Round 1: Work around the ring... 10 single crochet stitches. Finish by slip stitching into your first single crochet.


Round 2: Look at those single crochet stitches. Each one has a front and a rear bar. Continue with your yellow yarn. Chain 10, then slip stitch into the front bar of the first stitch from round 1. Chain 10, then slip stitch into the front bar of the next stitch. Continue around the circle until you have ten yellow loops.


Round 3: Take your orange yarn, chain 12 and slip stitch into the back bar of the round 1 stitches. Continue around the circle (chain 12, slip stitch into the back bar) until you have ten orange loops. Finish off by stitching in all loose ends and adding a button.


Please ask if you have any questions!

Happy crocheting!
Maggie

PS The patterns for the little pink flower and leaves and the red May Rose can be found at Attic 24.


Saturday, May 24, 2014

Lumpy Foods and Sippy Cups - the latest on Infant Nutrition


Recipe coming soon.... : )


This week I've been working on a sugar-free, healthier version of an oatmeal muffin for the little kidlets in my life. I've played around with banana and also made an apple raisin version. It's still in the “research” stage, but I hope to share the results sometime soon.

Rather timely, I thought, when I read this article in The Globe and Mail by Becky Blair, a registered dietician. If you know someone with little ones, pass along the link. Becky also shared a Government of Canada link for an excellent article on infant nutrition (birth – 24 months) – worthwhile reading for any new parent.  


Happy Weekend!
Maggie

Thursday, May 22, 2014

Little Bonbons: Mandala Project Idea


I've really enjoyed making little mandalas this past month. Lucy at Attic24 got me started and, since then, I've experimented with different yarns and patterns, sizes and colours. They're a happy little project to work on between baby sweaters and flowers.


But, what DO you do with them? Yes, they make pretty little summer coasters and a slightly larger one looks lovely under a glass jar of tulips. Lucy has a little cluster of them grouped on a wall.

But....here's another idea!

I use a recycled Mason jar for buttons...a little mandala “shower cap” was the pretty touch it needed!


This mandala was made from Little Bonbons cotton yarn. I've made a number of them (and some are saved for another project idea).


Check for size first, then on the wrong side string some elastic cord. I used Bead Landing 0.5 elastic...found it in the bead section of Michael's. Use a generous amount and thread three strands, checking to make sure it's not visible on the front.

Maggie's Button Jar

Inside out, secure your mandala to a recycled jar with an elastic band. Tighten and knot your elastic threads. That's it!


Thursday, May 8, 2014

Mandala Magic!

I've been trying my hand at crocheting a Mandala. Have you ever tried one? They are such pretty little bits of colour! 

Along the way, I've learned some new stitches and stretched a little by playing around with a beautiful design created by Barbara Smith at MADE IN K-TOWN.


I'm also trying to read and write patterns using symbols. Oh, my! That part is hard!  

I used my teeny tiny crochet hook and Lion Brand Yarns "Little Bonbons", however, you could use whatever yarn you have around.  Only very small amounts are needed.


Little Spring Mandala
designed by Barbara Smith (Made In K-Town)


The first mandala I tried, Little Spring Mandala, was designed by Barbara Smith at Made In K-Town. Simply beautiful!

The third round (pink) is “dc3tog”... double crochet three together... a new stitch for me, but Barbara explained it well.

The orange “overlay” stitch was also new. Google “overlay mandala” images to see what you can do when you layer colours over colours!

Maggie's Second Little Mandala
(based on Little Spring Mandala)

The second little Mandala follows the same directions for Rounds 1 – 4. I added an overlay stitch on Round 1 instead of Round 4.

As I wanted this one to be smaller, I skipped Rounds 6a, 6b and 7.

Instead, I did Rounds 8 and 9.

To help this little mandala tie in to the first one, I finished with the purple round. I like the little points! Can you figure out what I did by looking at the symbols? There's an excellent PDF Crochet Symbol Chart at Craft Yarn Council you can print for reference.

Maggie's Third Little Mandala
(based on Little Spring Mandala)
Here's my third experiment! I followed the Little Spring Mandala directions for Rounds 1 – 7 and then finished with a scalloped edge:

sl, sc, hdc, sc, sl

As I said, drawing the symbols is harder than you'd think! Clear as mud? Hope so!

Cheers,
Maggie

Tuesday, May 6, 2014

Bullet Journal


Do you keep track of “everything” on your phone? Do you have one of those little calendar notebooks in your purse? A calendar on the fridge? Scraps of paper? Sticky notes? Sheesh! I've tried them all.

Different systems worked for different stages... pre-kids, the crazy years with kids, the post-kid era, but I must admit I have been floundering a bit for the last year or two.

Yes, I managed to stay on top of appointments and important dates, but everything else (a good website, a crochet pattern, a recipe) was on scraps of paper. Grrrr! Scraps of paper that were lost sometimes before they were used. Notes that would float to the top when I was looking for something else, then disappear again.

About six weeks ago, I discovered Bullet Journal. There's nothing to buy. (The notebook in the picture is one I had in the house.) It's a quick system to learn and it keeps track of not just “calendar” type information, but all the other STUFF!! So far, in my journal I have recipes, patterns, ideas, notes from a few gardening talks I've attended, etc., AND, everything you record can be easily found with the index system you create as you go. No scraps of paper!

Anyway, watch the video, go through the website and check it out.

A few observations...

... The notebook I use has lines rather than graph paper as suggested. That's a personal choice, but I prefer lines.

... The book's elastic band? Perfect! Marks my “today” page and also keeps the book closed in my purse.

... I'm finding it easier to set up all the “day pages” at the beginning of each month and record the other things on the pages between months. I use a whole page for each day but Saturday and Sunday share a page.

... I still keep my grocery list on the fridge – it's not always me who picks up groceries. This system will work for you, but it is not one that can be referred to by multiple people. The fridge calendar is still needed if that's important in your family.

... I have some sticky notes stuck on the inside of the back cover. They're still useful.

... You still need to be diligent about recording tasks and events if you want the system to work. Neat printing and concise entries are also important.

Have a great day!
Maggie


Friday, May 2, 2014

Ham and Cheese Pinwheel Biscuits


Teddy Bear Toast
May I pass along a bit of grandmother wisdom?

Change the shape of anything you whip up in the kitchen and...

“instant glam”.

Example?

Peanut butter on a slice of bread?

Or, Teddy Bear Toast?


Just ask my granddaughter!

For lunch today, I made some Ham and Cheese Pinwheel biscuits to go with a big “freshly returned from the Farmer's Market” salad.

This is not my idea. I was working under the influence of my good friend, Christine of Strawberry Spinach Salad fame. She sometimes takes her basic scone recipe and makes Ham and Cheese Pinwheels.

A little quicker and easier version uses the biscuit recipe I shared last week. With no butter to cut in, these biscuits can be whipped up in no time at all. Gently roll out the dough (about 12” square) and sprinkle with about 1/2 – 3/4 cup of grated cheese. I used cheddar and parmesan. Shred 2-3 slices of Black Forest Ham on top. Roll up tightly and slice into pinwheels. I used parchment paper on my baking tray and baked these little guys a little longer – about 20 minutes instead of 15.


Happy Friday!
Maggie