Showing posts with label DIY. Show all posts

Monday, December 2, 2013

A Christmas Arrangement for your doorstep...10 easy steps!


At our last KidLit meeting, the talk turned to Christmas and one of us remembered the beautiful Christmas arrangements our hostess had at her front door last year.  Well, "in a blink of an eye..." and a "hey, why don't we...", it was all set.  Six of us met one day last week and here's what happened.... 


Here are a few things I learned along the way:


1.  We used garden pots still full of soil.  If you live in Canada, defrost first by bringing inside the day before!

2.  Use a variety of twigs, branch trimmings and greens- cedar as well as green and blue spruce.  Some was purchased, but much of what we used came from our gardens.

3.  Start at the back of the pot with 2-3 spruce branches, then add a middle row.  Create a triangle shape with higher branches in the back.  Next, fill in with cedar.  Leave an open spot in the front for a bow.


4.  At the back, add a tall, glittery "branch" of something.  It should be slightly to the left.  This item should be quite noticeable - red or silver.  One person used purple! Another had a stake with multiple little balls on it.

5.  Next, again at the back, add some fine, gold stems.  I called them "curly wurlies".  Can you see them?  Delicate, they make a nice contrast to your branch.  Make sure they are in little clusters of three.  

6.  Start to fill in with ornaments, cones, and sprays of berries.  (Search through your Christmas boxes and make a trip to the dollar store first!)  We prepped each item by attaching it with

florist wire to a bamboo BBQ skewer. Use a glue gun for the cones.  Wrap the skewer with green florist tape, attaching a second skewer as you go - you'll need that extra length.


7.  Very important....think THREE!  Add three of everything you pick and make sure no two are in a straight line vertically or horizontally.  Think "back, middle, front" and "high, medium, low" so your arrangement is balanced and has depth.

8.  Friends are important!  Take time to stand back frequently and look.  Focus in on one colour or item at a time.  Is it balanced?  Do you have a variety of shapes?  Add a little more "curly wurly" stuff!

9.  Add your bow.  These bows used a whole roll of ribbon each (Only $1.00 at the Dollar Store!!)  Leave a tail (2 feet), then generously loop the ribbon and pinch between your fingers.  With your free hand, twist the ribbon and make a second loop the other direction.  Keep looping, pinching, twisting back and forth.  The last few loops should be slightly smaller.  Remember to leave enough for the other tail.  Use wire to twist around the middle and tie to a bamboo skewer.  

10.  Last check...  A cone or ball peeking out behind the bow, half hidden, looks nice.  Make sure you have enough greenery on each side of the bow.

This was so much fun.  Our arrangements are NOT perfect, but we're so pleased with how they turned out.  They didn't cost much either and we plan to save all the "bits" for next year.

It's starting to feel a bit like Christmas!
Maggie

Friday, November 15, 2013

Little Christmas Ornaments to Knit and Crochet

Jingle Bells


My little stack of bells is growing!  

I love little projects!  Easy to carry around, simple enough to do while watching a movie, quick to finish... : )

Last year, I knit little toques and stockings to give away.  I also tried a few bells - here are the directions.  


This year, I've also been crocheting little stars.  Lucy from Attic24 has a free pattern you can try. 

A Tiny Star - from Attic24


My first little stars were made with the same wool I used for the bells and toques -

Vanna's Choice by Lions Brand.  I then experimented with some finer, gold yarn (3.5 hook) and then the Winter Red Lustre-Sheen by Red Heart.  


I'm pleased with how these little ornaments are turning out!  

Maggie

Friday, August 9, 2013

DIY Crochet Project: Flower Power!


Flowers are blooming!  Well, maybe not in my garden - but they're definitely popping out of my yarn basket.  

I found a great little (free!) pattern, Maybelle Crochet Flower, that's available as a PDF in either UK or USA terms.  You might like it, too.  If you are a visual person, check out the photo tutorial My Rose Valley created.

This pattern is easy to follow and quick to memorize, so it's just right for when I'm watching TV or chatting.  And the flowers are small enough to take along when I go out.  

Maybelle Flowers


Wouldn't this flower pattern make a beautiful baby blanket for a little girl?  Rose flowers, or maybe a variety of pastel shades, with a cream border would be very pretty.  
Crochet hook: 4.50 mm

Wool: Vanna's Choice (Lion Brand) and Impeccable (Loops & Threads)

"The Plan": These little flowers will be bordered in green and turned into 7-inch squares for an afghan. I've simplified the square pattern My Rose Valley posted and now I'm thinking about how I'll join the squares and create a border.

It's enjoyable having another project on the go!  


Friday, December 7, 2012

# 78 A little thing that makes a difference...


I often use a "half water, half vinegar" solution for cleaning.  

Why?

"...studies... show that a straight 5 percent solution of vinegar―the kind you can buy in the supermarket―kills 99 percent of bacteria, 82 percent of mold, and 80 percent of germs (viruses)."
 - www.care2.com

At school, kids could use it for cleaning desks.

At home, it removes hard water residue on my Silestone quartz kitchen countertop. 

It's cheap!

BUT, I don't like the smell. 


So... I tried soaking orange peels in my vinegar for a week first. (Thank you, Pinterest!) 

And now it smells not half bad!

Monday, December 3, 2012

DIY... (free!!) initials, labels and tags to download...


Happy Monday!  We had a productive weekend at our house - items were purchased or made and a number of names have been checked off the list.  

So... today, wrapping is on my "to do" list.

For many years our gifts under the tree have not had name tags.  

No, it wasn't a quaint tradition...

The moment gifts came into the house, they were wrapped and tucked under the tree.  Without tags, we reasoned, it was a little more difficult for the kids to determine what was inside those mysterious packages.

Anyway (fast forward to today), our smaller gifts (in an effort to minimize commercialism and stress) in their (recycled) gift bags are becoming more difficult to distribute Christmas morning.  

So, this year I've decided to add initial tags... 


These small (1.5 x 2 inches), initial tags could be printed on coloured paper or cardstock.  They come in three colours or you can print them in black like I did.  Print landscape and you'll be able to get eighteen to a page.  Punch a hole and add a ribbon, raffia or twine for a tie...you're set to go!  


Cathe Holden designed these 2.5 inch diameter, round, blank labels - six colours available.  As she points out on the website, you can "use these vintage designed round labels for your jars with jam, tin containers for candles, use them for wedding favor gifts, for organizing your kitchen, for organizing your personal items or for anything you need to make look beautiful!!!"

Looking for something bigger?  Wedding Chicks has the answer!


And for those of you with a colour printer and LOTS of time today, check World Labels Pinterest site - free printables for every occasion!  

PS  Put on a BIG pot of coffee first.  

Have fun!

Monday, November 26, 2012

# 75 DIY...free, downloadable letters for crafting


Here's something you might be interested in!

Leo Reynolds has an amazing photograph collection on Flickr!


In particular, look at his collections of letters and numbers.  You can choose a pre-made set of letters such as this one...


... or browse through individual letters for one you especially like.  For example, there are 973 photographs of the letter "A".  You are allowed to download and use the letters for non-commercial purposes.

Imagine printing out the letters for a child's name and framing them individually...  

Or, printing just a child's initial and using it in a collage frame of photographs...


Wednesday, November 14, 2012

# 67 Christmas ornaments: little handprints, big memories

 
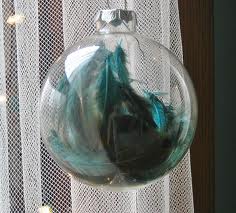
Yesterday, my daughter-in-law bought some clear balls.  She's planning to put feathers in some of them.


She also bought some "baby safe" glue and pink glitter to try one like this example.  She plans to make two "special" ornaments each year with our little granddaughter...one for the family tree and one to save for when she has her own tree!


At school we made snowmen ornaments.  Here's mine!  White acrylic craft paint was used to make a handprint.  The palm became the ground and the fingers were decorated with Sharpie felts


Some more handprint ideas from Pinterest...  


Friday, October 26, 2012

# 50 Super Simple DIY: Autumn Hallway Accents


I don't go all out decorating (no competition from this corner!!), but I do like to add a few seasonal accents.  

A few weeks ago I made this wreath.  Ya gotta love glue gluns!!

Then I actually dusted the hall table before I made a little display there.  The burlap cloth was literally a 2 minute DIY project - iron, measure, cut, pull threads to make a fringe.  Simple and I like the texture.


Today, for a little aromatherapy, I added an orange and clove pomander. Again, super simple...a skewer to poke holes, stick in  cloves, rinse and pat dry.


Wednesday, October 24, 2012

# 48 Need a baby gift? Here's a darling little hat to knit.


I've just finished this sweet little project.  Isn't it cute?  I love the little knot at the top!


This was a free pattern I downloaded from www.craftsy.com

Called "Baby Hat with Top Knot - Tegan", it was designed by Julie Taylor from the U.K.  It's made with double pointed needles (two sizes) and actually should look like this:


My hat doesn't curve in at the bottom because I only had the larger size needles.  That's why I rolled up the brim.  For wool, I used Bernat Softee Baby.  The directions were so simple - good for working on while watching TV, etc.  

Wednesday, October 3, 2012

# 37 More Wrist Warmers...this time, knitted!


YARN: Half a 3.5 oz. ball of Vanna's Choice (LionBrand.com), 100% Acrylic.  

NEEDLES: 4 size 6 double pointed (4.0 metric; 8 UK)

Same ball of wool as yesterday, but a very different effect! 


Knit a tube (12 stitches per needle / three needles = 36 stitches). This version has 6 rows of grey, 14 rows of a variegated wool, 25 rows of grey. 

I made the thumb hole on row 12: knit 3, finished off 6 for the hole, knit 3.  The next time around I knit 3, added 6 stitches, knit 3.

Single crochet around top to finish.


Tuesday, October 2, 2012

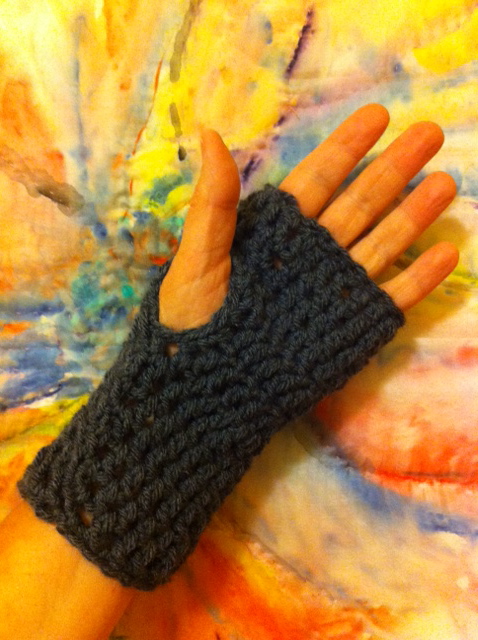
# 36 DIY: Crochet a Pair of Wrist Warmers!


For a bit of a change (after bunnies and puppies), I felt inspired by Sandra Juto's Wrist Worms


YARN: 3.5 oz. ball of Vanna's Choice (LionBrand.com), 100% Acrylic (makes two pairs). 

HOOK:  G/6; 4.0 metric;  8 UK.

Basically a tube of 13 double crochet rows, I started and ended with a row of 22 single crochet.   

The thumb opening was started on row 4. Instead of joining onto the first stitch of that row, I single crocheted back  along the row.  I did that three times before continuing with my tube.   I finished by crocheting around the thumb hole. 


Sunday, September 30, 2012

# 34 DIY: Autumn Wreath


I always feel I'm a craft "season" behind when I visit Michael's! 

Today, being behind was great, however, as everything "fall" was on sale.


Materials:
  • wreath
  • one spray of fall leaves & berries
  • one roll of wire-edged orange ribbon (used half)
  • small wood ornament
  • one flower

Tools:
  • mini glue gun
  • scissors
Loosely wrap the ribbon around the wreath.  Tack lightly on the back with glue gun.

On the bottom left, glue three pieces: wood ornament, flower and sprig of berries. 

Take spray of leaves apart and glue leaves around wreath.  Cut remaining two sprigs of berries into clusters and attach.


Monday, September 24, 2012

#28 Knitting for Babies: Bunnies and Puppies


I am NOT a knitter, but this summer I discovered Craftsy and tried some quick, inexpensive  projects to build up my skills.


The bunny was a paid class, "Wee Ones: Seamless Knit Toys" that included:
video lessons 
very clear patterns (bunny, hippo, elephant, little sweater)  
you can post questions (the instructor replies promptly)  


The puppy and beanie were free patterns. 

In addition to knitting, there are DIY and gardening classes, sewing projects, quilting patterns, cake decorating lessons, etc.  One night I watched "Modern Buttercream" (free).  I'm not interested in trying, but it was fun to watch.  

Craftsy - worth checking out!