Showing posts with label Christmas. Show all posts

Monday, December 2, 2013

A Christmas Arrangement for your doorstep...10 easy steps!


At our last KidLit meeting, the talk turned to Christmas and one of us remembered the beautiful Christmas arrangements our hostess had at her front door last year.  Well, "in a blink of an eye..." and a "hey, why don't we...", it was all set.  Six of us met one day last week and here's what happened.... 


Here are a few things I learned along the way:


1.  We used garden pots still full of soil.  If you live in Canada, defrost first by bringing inside the day before!

2.  Use a variety of twigs, branch trimmings and greens- cedar as well as green and blue spruce.  Some was purchased, but much of what we used came from our gardens.

3.  Start at the back of the pot with 2-3 spruce branches, then add a middle row.  Create a triangle shape with higher branches in the back.  Next, fill in with cedar.  Leave an open spot in the front for a bow.


4.  At the back, add a tall, glittery "branch" of something.  It should be slightly to the left.  This item should be quite noticeable - red or silver.  One person used purple! Another had a stake with multiple little balls on it.

5.  Next, again at the back, add some fine, gold stems.  I called them "curly wurlies".  Can you see them?  Delicate, they make a nice contrast to your branch.  Make sure they are in little clusters of three.  

6.  Start to fill in with ornaments, cones, and sprays of berries.  (Search through your Christmas boxes and make a trip to the dollar store first!)  We prepped each item by attaching it with

florist wire to a bamboo BBQ skewer. Use a glue gun for the cones.  Wrap the skewer with green florist tape, attaching a second skewer as you go - you'll need that extra length.


7.  Very important....think THREE!  Add three of everything you pick and make sure no two are in a straight line vertically or horizontally.  Think "back, middle, front" and "high, medium, low" so your arrangement is balanced and has depth.

8.  Friends are important!  Take time to stand back frequently and look.  Focus in on one colour or item at a time.  Is it balanced?  Do you have a variety of shapes?  Add a little more "curly wurly" stuff!

9.  Add your bow.  These bows used a whole roll of ribbon each (Only $1.00 at the Dollar Store!!)  Leave a tail (2 feet), then generously loop the ribbon and pinch between your fingers.  With your free hand, twist the ribbon and make a second loop the other direction.  Keep looping, pinching, twisting back and forth.  The last few loops should be slightly smaller.  Remember to leave enough for the other tail.  Use wire to twist around the middle and tie to a bamboo skewer.  

10.  Last check...  A cone or ball peeking out behind the bow, half hidden, looks nice.  Make sure you have enough greenery on each side of the bow.

This was so much fun.  Our arrangements are NOT perfect, but we're so pleased with how they turned out.  They didn't cost much either and we plan to save all the "bits" for next year.

It's starting to feel a bit like Christmas!
Maggie

Friday, November 15, 2013

Little Christmas Ornaments to Knit and Crochet

Jingle Bells


My little stack of bells is growing!  

I love little projects!  Easy to carry around, simple enough to do while watching a movie, quick to finish... : )

Last year, I knit little toques and stockings to give away.  I also tried a few bells - here are the directions.  


This year, I've also been crocheting little stars.  Lucy from Attic24 has a free pattern you can try. 

A Tiny Star - from Attic24


My first little stars were made with the same wool I used for the bells and toques -

Vanna's Choice by Lions Brand.  I then experimented with some finer, gold yarn (3.5 hook) and then the Winter Red Lustre-Sheen by Red Heart.  


I'm pleased with how these little ornaments are turning out!  

Maggie

Monday, December 24, 2012

Soft Ginger Snaps


Hi!  It's me!  Glad to be back....finally!

Today I've started my Christmas baking.  A little tardy, you ask?

Just trying to save myself from all those calories.  Stashing things away in the freezer doesn't help.  I'm still willing to nibble... :  )

Soft Ginger Snaps
Today's recipe was given to me by a dear, sweet German lady about 15 years ago and I think I've made it every year since.  

It's easy and reliable and makes a lot!  I often just make half the recipe and I still get about 3  1/2 dozen (tiny) cookies.

Soft Ginger Snaps

3/4 cup margarine, melted
1  1/2 cups white sugar
2 eggs
1 cup table molasses

Cream margarine and sugar well.
Add eggs one at a time, beating well after each addition.
Add molasses; mix well.

4 cups flour
1 tsp. salt
1 tsp. baking powder
1 tsp. baking soda
2 tsp. ginger 

Combine dry ingredients and add to liquid ingredients 
(about 1/3 of the flour mixture at a time).

Roll into tiny, one inch balls.  Dip and roll balls in sugar.
Place on greased cookie sheet.
Bake at 350 degrees for 8 - 10 minutes.


Thursday, November 29, 2012

Learn to knit... more (free!) Christmas tree decorations


After knitting quite a few little stockings and hats, I've moved on this week to Christmas bells.  This has to be the easiest, quickest project yet!  


I started with this free pattern, but have made a number of adjustments (needle size, yarn, etc.) along the way.

Needles: 4.0 mm or size 6 (US)
Yarn: Vanna's Choice by Lion Brand 

Cast on 15 stitches then knit one row.

Row 2: Purl 5; knit 10
Row 3: Knit 15

Repeat rows 2 and 3 until you have about 38 - 40 rows.  Note how the rectangle begins to flare and the five knit stitches begin to curl.  Finish at the curled end (bottom of the bell).  


Leave a 2 foot tail when you cut the yarn.  Use that tail to sew the sides together (a tube shape).  Continue by gathering the stitches around the top and pulling tight to close off the top.  Now that you have a bell shape, put in a few stitches at the top of the bell to secure the yarn.  

But don't cut the tail.  : )

With a crochet hook, use the remainder of the tail to crochet 15 single crochet stitches to make a loop to hang your bell.  Stitch to secure the end of the loop at the top of the bell.

But don't cut the tail.  Not yet!  : )

Use the remainder of the yarn to sew a jingle bell inside.

NOW cut the tail.  : )

Since these little bells are just one colour, you can add a yarn "bow" (2 rows of 15 single crochet stitches), a ribbon bow or a Christmas button to add some extra Christmas colour.

I'm quite excited and looking forward to giving an assortment of these little knitted ornaments to two young families just starting their Christmas tree traditions!  If I have time before Christmas, I would also like to try the little mittens and bags pictured below.


Have a great day!

From Santa's workshop,
Maggie

Check out Craftaholics Anonymous (Christmas Craft Linky Party
for this project and many more.

Thursday, November 22, 2012

# 72 Learn to Knit...free Christmas tree decoration patterns


The hats are from Knitting On the Net - the simplest, quickest project imaginable!  I made the brim 10 rows so it looks a little fuller.  I'm using this pattern to learn how to use multiple colours of wool and create patterns.  The hats fit perfectly on top of a bottle of wine, beer or gourmet ______ if you want to dress up a hostess gift.


The stocking pattern from Little Cotton Rabbits is also free. I'm using it to learn how to follow a pattern chart and make heels.  It's a perfect size for some Hershey Kisses or a Matchbox car!

Monday, November 19, 2012

# 71 Knitting...Santa hats and mini-stockings


Yesterday I finished this little project - a Santa Beanie!


It's based on the baby hat I knit last month...


...with a few modifications.  

The red is "Scarlet", Vanna's Choice by Lion Brand and the white is "Natural" Bernat Soft Boucle.

I followed the directions and used the two sizes of needles as outlined in the original pattern. The end is stuffed with wool scraps and tightened to create a pom-pom effect.

Notice the "laddering"?  I didn't know what that was until I discovered this video at VeryPink.  Lots to learn!!

Next project?  Perhaps these mini-stockings.  Aren't they sweet?


Wednesday, November 14, 2012

# 67 Christmas ornaments: little handprints, big memories

 
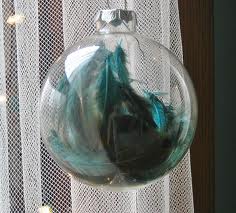
Yesterday, my daughter-in-law bought some clear balls.  She's planning to put feathers in some of them.


She also bought some "baby safe" glue and pink glitter to try one like this example.  She plans to make two "special" ornaments each year with our little granddaughter...one for the family tree and one to save for when she has her own tree!


At school we made snowmen ornaments.  Here's mine!  White acrylic craft paint was used to make a handprint.  The palm became the ground and the fingers were decorated with Sharpie felts


Some more handprint ideas from Pinterest...